The Storyboard is like a comic strip for your movie, laying out rough sketches and inspiring shots sequentially to start telling your story.
Opening Storyboard
You can access Storyboard from the project navigation panel, on the left-hand side.
Note: The following documentation applies only to Film & TV and Stageplay projects. For information about Multi-Column AV projects click here.
Using the Storyboard
The Storyboard allows you up to upload images that represent key shots of a given scene. This can be used in a variety of creative ways. You can use it to spell out the main 'cuts', essential to the story, or to establish the 'visual language' of the scene or film itself.
1 - Sequence Panel
Storyboards are organized into sequences. You can see an overview of all the sequences in your storyboard from the Sequences Panel. Jump to the Sequence Panel section for more information.
2 - Panels
The building blocks of your sequences, panels are organized from left-to-right within a sequence. Jump to the Panels section for more information.
3 - Presentation View
The presentation view lets you preview your panels in sequence, make annotations, and update shot information in one view. Jump to the Presentation View section for more information.
4 - Comments
Review and add comments from the comments panel. Jump to the Comments section for more information.
5 - Storyboard layout
You can adjust how many panels are shown per row here.
6 - Aspect ratio
Working in a different aspect ratio? You can adjust the aspect ratio for your panel here. Choose from widescreen (16:9), standard (4:3), square (1:1), and portrait (9:16).
7 - Undo / Redo
If you make a mistake you can easily click undo here or use keyboard shortcut CTRL +Z (Windows) or Command +Z (Mac).
Sequences
1 - Creating a sequence
You can sync your script with the Storyboard to automatically generate sequences linked to your scene headings. Need a sequence that’s separate from a scene? You can manually add sequences as well by clicking the + icon in the sequence panel.
2 - Navigating to a sequence
To jump to a specific sequence, simply click it in the Sequences panel on the left hand side of your screen.
3 - Syncing your script with storyboard
Your storyboard is connected to your script data, but you choose when to sync updates. When you click Sync Script, your storyboard will automatically:
- Add sequences for any new scenes
- Update the title of sequences linked to scenes if the scene heading has changed
Sequences linked to a scene will have a link icon next to the sequence title.
4 - Navigating between Storyboard and your script
If your sequence is linked to a scene in your script you can jump directly to that part of your script by clicking the (icon) on the sequence.
5 - Reordering sequences
You can drag & drop sequences to re-order them. This will move the sequence and any shots within it. You can do this from either the Sequences panel on the left or the storyboard view on the right. Note that moving a sequence will update the sequence number.
6 - Renaming a sequence
To rename a sequence, click on the menu icon (ICON) and click “Rename”. After typing a new title, hit “enter” to save your changes.
Panels
1 - Adding and re-ordering panels
To add a panel to the Storyboard, click "Add Panel". A new panel will be added to the sequence. You can drag and drop your shots to re-order them or move them to a different sequence.
2 - Duplicate a panel
To duplicate a Panel, click the menu icon (ICON), and click "duplicate".
3 - Delete a panel
To remove a panel, click the menu icon, and click "remove". Note this will delete the panel. If you change your mind you can click undo or restore a previous version of your storyboard by going to File > History.
4 - Select a shot type
The Shot Selection dropdown menu allows you to define the framing of the shot you'd like to see for a given panel. You have the following options:
- ECU - Extreme Close Up
- CU - Close Up
- MCU - Medium Close Up
- MS - Medium Shot
- MWS - Medium Wide Shot
- WS - Wide Shot
- EWS - Extreme Wide Shot
5 - Add or change an image
Click "Add an Image" to select an image on your device. To change the image of an existing shot, hover your mouse over the image and click delete. You can then select a new image file to upload. Alternatively, you can click “Replace Image” when the Presentation View is open.
6 - Add a description
The Description field allows you to briefly summarize the panel. This can be a narrative or cinematographic note.
Presentation View
The presentation view lets you preview your panels in sequence, make annotations, and update shot information in one view. You can access Presentation View by:
- Hovering over a panel and clicking “Open”
- Clicking the menu icon (ICON) on a panel and clicking “Open in Presentation View”
- Clicking the Presentation View icon (ICON) in your toolbar
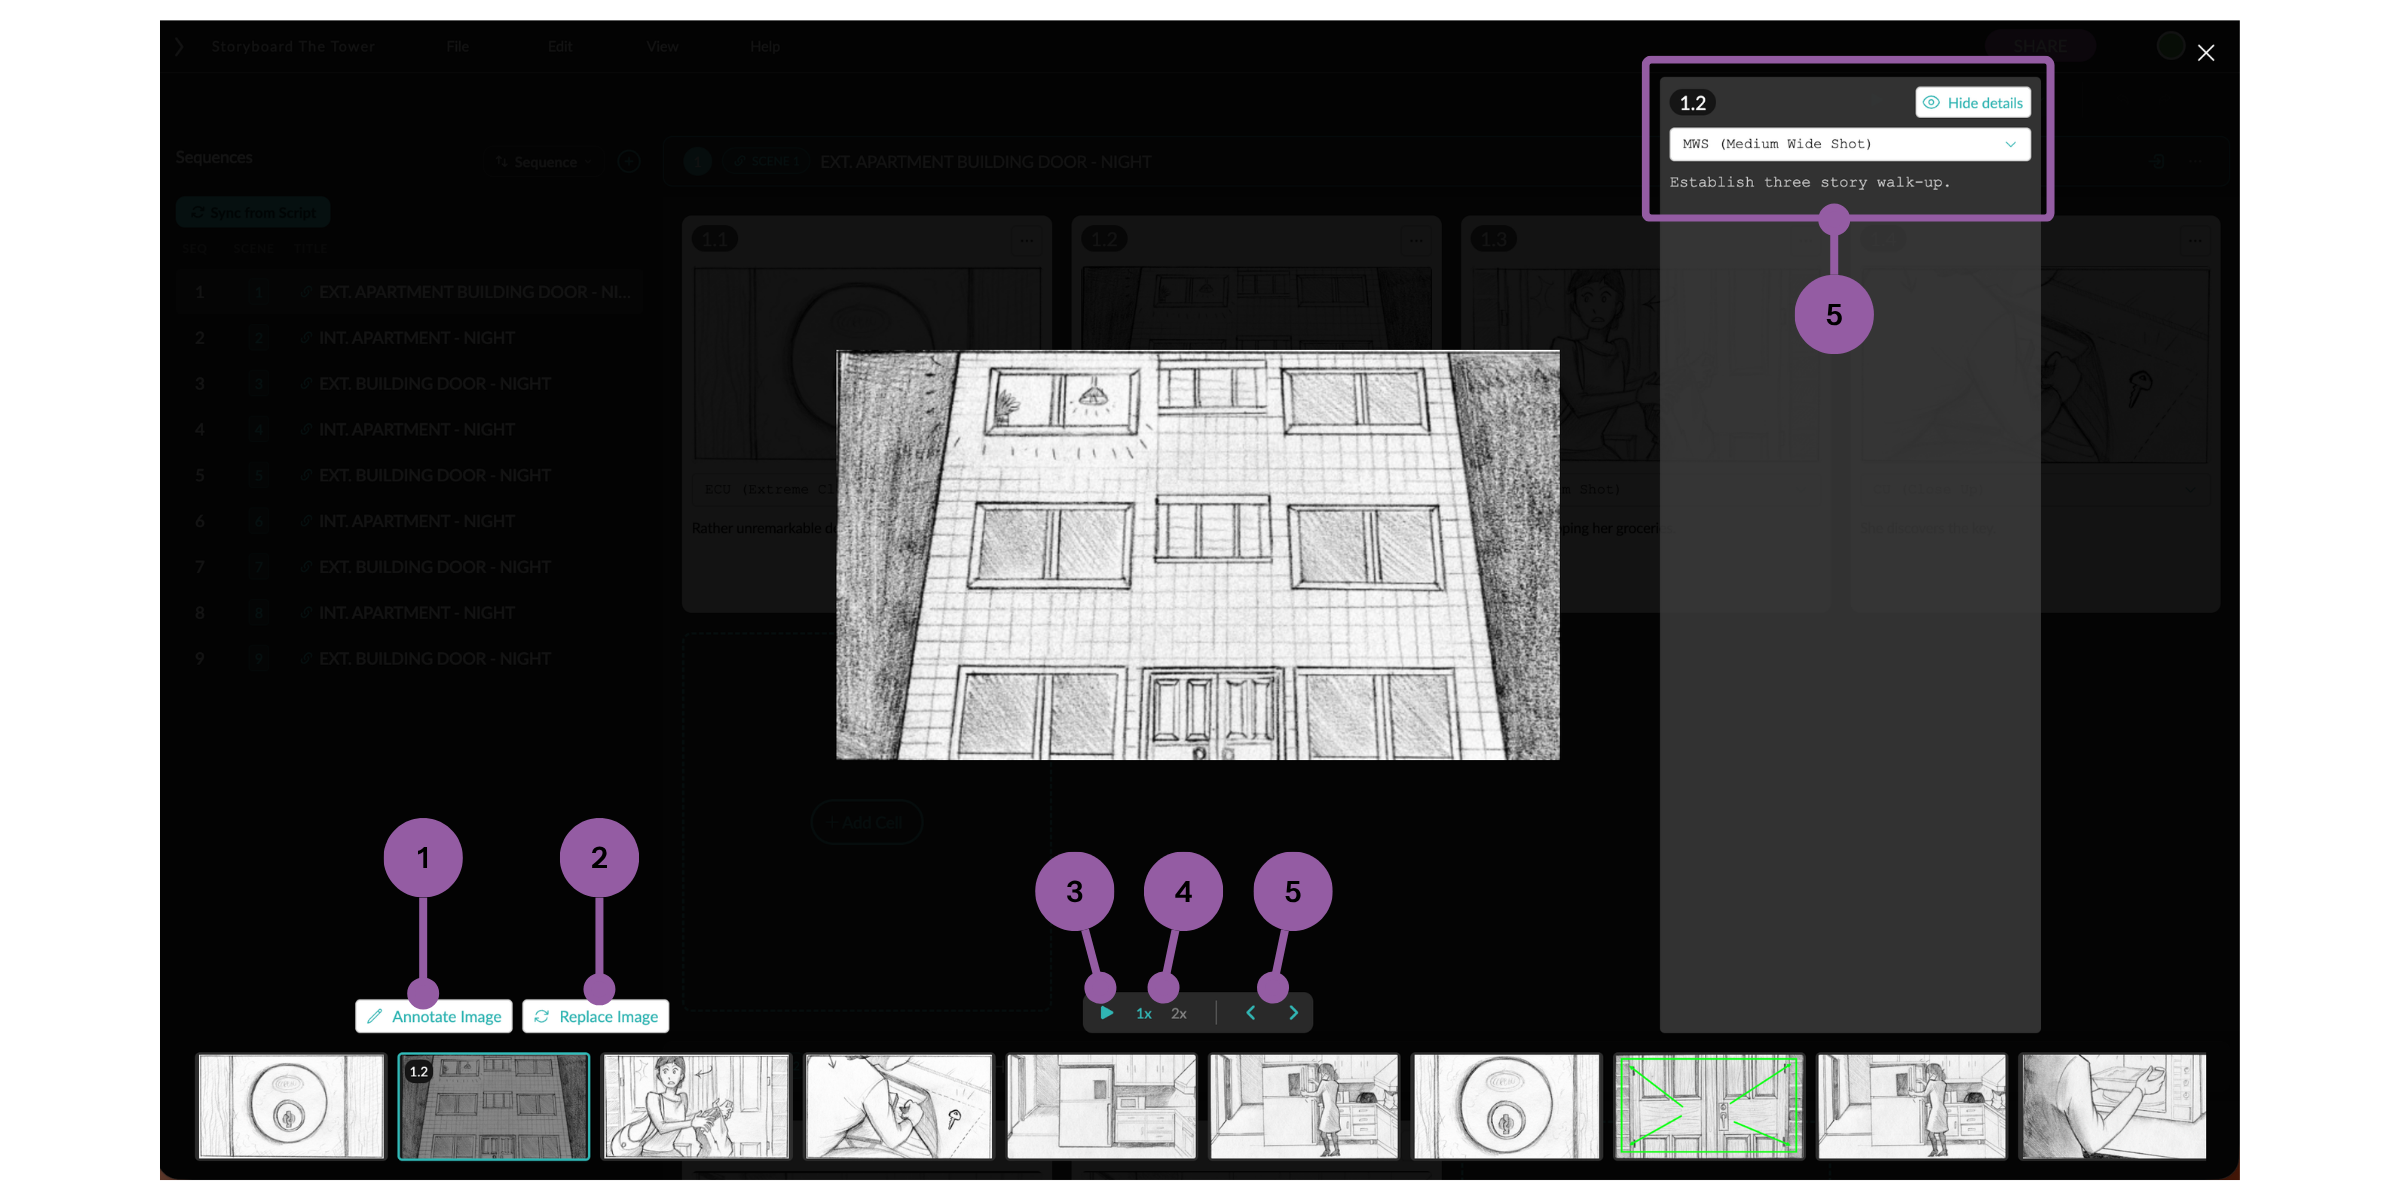
1 - Annotation Mode
Use this mode to quickly add arrows, text, or other drawings to help indicate how a shot will be blocked.
2 - Replace image
Easily swap out the panel image without leaving preview mode.
3 - Preview your storyboard
Start the storyboard playback and watch your panels play in order.
4 - Adjust the speed of your storyboard playback
You can adjust how quickly playback switches between panels here.
5a + 5b - Navigate between panels
You can manually flip between panels by clicking the < > arrows. Alternatively, jump ahead by clicking a panel in the navigation bar at the bottom of the Panel Preview window.
6 - Adjust or hide panel details
You can edit your panel details without leaving preview mode. You can also hide them for a cleaner playback experience.
Image Annotations
Annotations allow you to quickly indicate how a given shot will be blocked. You can annotate the images you add or a blank panel.
1 - Draw mode
Draw mode lets you sketch free-form on your panel image. You can use this mode to quickly mark up your shot.
2 - Add text
You can leave text notes right on the panel image. This is helpful if there is important context you can’t otherwise indicate visually.
3 - Add a shape
You can add arrows, lines, ellipses, or rectangles to help illustrate camera movements, etc.
4 - Undo
If you make a mistake, you can easily undo it by clicking this button or CTRL+Z (Windows) / Command +Z (Mac)
5 - Save or discard changes
Save your annotations by clicking the check mark. To discard all changes you made since opening annotations, click the X.
Comments
Collaborating on a storyboard? You can easily leave comments and tag specific panels.
1 - Open comment panel
You can see all comments left on your storyboard in the comment panel. Click the comment icon to toggle the panel open and closed.
2a + 2b - Add a comment
You can add a general comment by clicking the + button in the comments panel. Or comment on a specific shot by clicking the menu icon (ICON) and clicking “Add Comment”
3 - Tag a collaborator in a comment
Use @ to tag a collaborator shared on the project in your comment.
4 - Reply to a comment
Keep conversations organized in threads. You can reply to comments by clicking “reply”
5 - Resolve a thread
Finished with a comment or thread? Click the menu icon (ICON) then “Resolve” to archive the comment.
6 - View resolved comments
Click “Show Resolved” to include resolved comments in the panel.