For your Screenplay and Stageplay Scripts, you'll have the option to customize the Settings for each project. You'll find the option to edit these settings under the "Edit" dropdown.
There are several options available for customization via the Script Settings Menu:
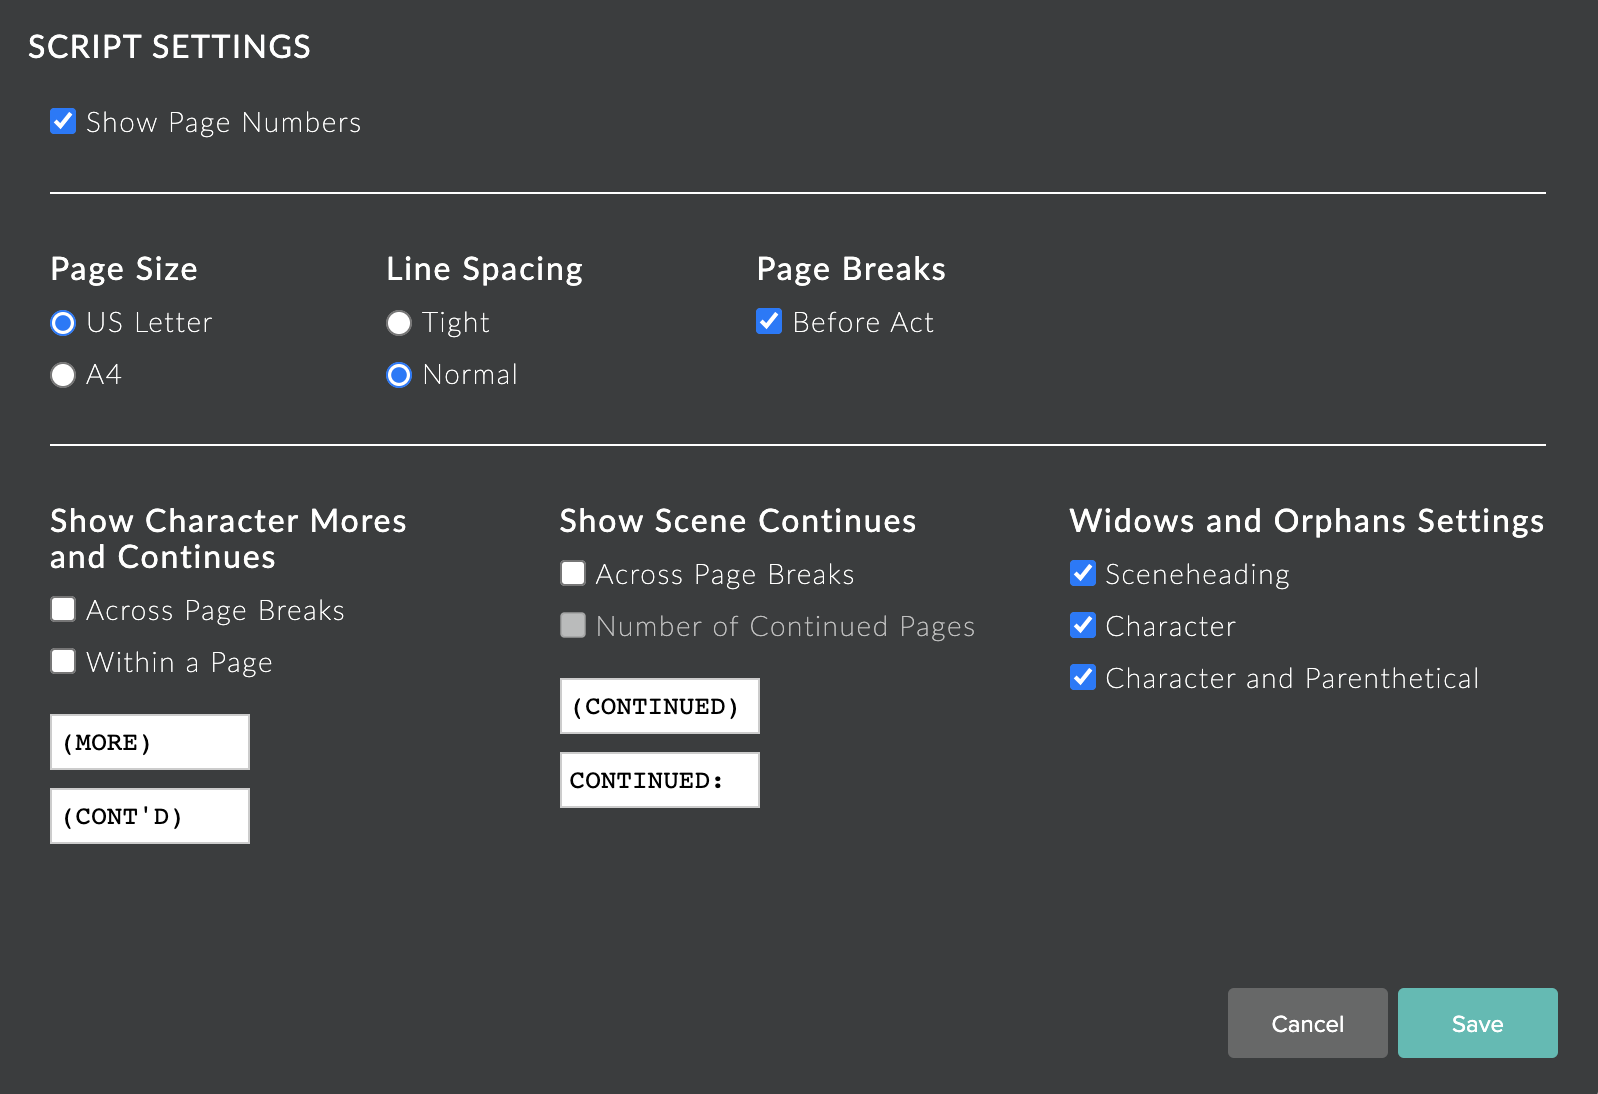
Show Page Numbers
This option allows you to determine whether your script can include page numbers. If this checkbox is selected, you'll be able to edit where the Page Numbers appear in your script via the Edit > Headers & Footers menu. By default, page numbers are turned on.
*Please note that page numbers begin on page 2, as per industry standard, and that including a Title Page will not alter this count.
Page Size
Select whether your Script is created on US Letter sized pages (8.5" x 11") or on A4 sized pages (8.25" x 11.75").
Line Spacing
Line spacing choices are 51 (normal) and 53 (tight) for US Letter, and 56 (normal) and 58 for A4.
Page Breaks
If the checkbox for "Before Act" is selected, each new Act will begin on a new page.
Show Character Mores and Continues
If your dialogue continues across multiple pages, you may want to indicate this by having MORE appear at the bottom of the first page, and using CONT'D following the name of the character as the dialogue begins on the second page. This can be done by selecting the checkbox beside "Across Page Breaks".
You can also use this function in a similar way if your character's dialogue is separated by a description within a single page, by adding CONT'D after the character's name appears the second time. This can be done by selecting the checkbox beside "Within a Page".
*Please note that while MORE and CONT'D are industry standard, you can customize these by editing the text field for each, if these options are turned on.
Show Scenes Continues
To indicate whether a scene continues across a page, select the checkbox beside "Across Page Breaks". This will have (CONTINUED) appear on the bottom right corner of your Script pages where scenes will continue onto the next page (above the page number, if this is enabled).
If you would like to indicate across how many pages a single scene continues, you can select the checkbox beside "Number of Continued Pages". This will appear on your Script at the top left of each new page that the Scene continues on to, as CONTINUED: 2, for example.
*Please note that while (CONTINUED) and CONTINUED: are industry standard, you can customize these by editing the text field for each, if these options are turned on.
Widows and Orphans Settings
The words and sentence snippets that become stranded on their own at the top or bottom of pages, when sections of text and paragraphs flow on to a second page, are called "Widows" and "Orphans". Celtx allows you to manage these, with Widows and Orphans Settings, as it's always best to keep these sections of text on one page whenever possible.
Simply check the box beside the options available - Scene Headings, Character, or Character and Parenthetical" to have Celtx ensure that these danglers and hangers-on are kept together across page breaks, for continuity in reading.
Still have questions? Please don't hesitate to reach out to support@celtx.com.